Have you ever opened an Excel sheet and found a complete mess? Those sneaky line breaks in Excel cells can turn perfectly good, organized data into something totally unreadable. Maybe you imported address lists, or perhaps customer feedback got stuck in multi-line cells. These formatting errors cause big problems!
Not only does your spreadsheet look unprofessional, but they also stop formulas from working right, make data analysis complicated, and waste huge amounts of your time cleaning things up manually.
The good news? Learning how to remove line breaks in Excel is much faster and simpler than you might think. The right way to fix the problem just depends on your specific data challenge. According to a 2024 survey of data professionals, they spend over 62% of their data preparation time just cleaning up formatting issues like line breaks—that’s time they could have spent actually analyzing data! If you also deal with documents outside of Excel, make sure you know how to remove line breaks in Microsoft Word to prevent import issues.
In this complete expert guide, we’ll walk you through five proven ways to eliminate line breaks from your Excel spreadsheets. We cover everything, from the simple, click-and-go Find and Replace tool to advanced automation using VBA macros and Power Query. By the end of this article, you’ll know exactly which technique works best for your data challenges and how to use it like a pro.
Understanding Line Breaks: Why They Happen & Why You Need to Remove Them
So, what exactly are Excel line breaks, and why do they appear? Usually, they happen when someone hits Alt + Enter while typing in a cell, forcing the text to drop to a new line within that same box. While this can be helpful for writing long addresses or multi-part instructions, line breaks become a huge headache when data is imported from outside sources. This often occurs when copying data from a PDF, which introduces hidden formatting codes.
Common sources of unwanted line breaks:
- Data copied from web pages or PDFs that include formatting
- Database exports that keep the original line feeds
- Form responses from Google Forms or SurveyMonkey
- Text pasted from emails or word processors
- Old spreadsheet files that were moved to a new system
When line breaks stay in your data, they create compounding problems. Formulas that search for specific text may fail completely. VLOOKUP and other lookup tools can’t find the values they need. When you try to summarize this data using PivotTables or put it into reports, the formatting totally breaks down. Plus, many modern data tools and databases can’t even process line breaks—you have to clean them out before importing.
The business impact is real: Companies lose an estimated 5–15 hours every month per data analyst just dealing with line break issues. Removing these characters early on prevents bigger problems down the line and ensures your data is reliable throughout your entire workflow.
Quick Comparison: Find Your Perfect Method (Decision Framework)
Before we jump into the step-by-step instructions, use this comparison to choose the best approach for your situation:
| Method | Speed | Skill Level | Best For | Preserves Original | Effort |
|---|---|---|---|---|---|
| Find & Replace | Beginner | Quick cleanup of 1–5 columns | No | Minimal | |
| SUBSTITUTE Function | Intermediate | Formula-based workflows | Yes | Low | |
| CLEAN+TRIM | Beginner–Intermediate | Removing multiple unwanted characters | Yes | Low | |
| VBA Macro | Advanced | Recurring automation, large datasets | No | High setup, minimal ongoing | |
| Power Query | Intermediate | Regular data imports with line breaks | Yes | Medium setup |
Quick decision guide:
- Cleaning data once? → Use Find and Replace (fastest)
- Building a reusable formula? → Use SUBSTITUTE with CHAR(10)
- Need a backup without changing source? → Use CLEAN+TRIM or formulas
- Processing monthly? → Invest in VBA or Power Query
- Importing recurring data? → Power Query is your answer
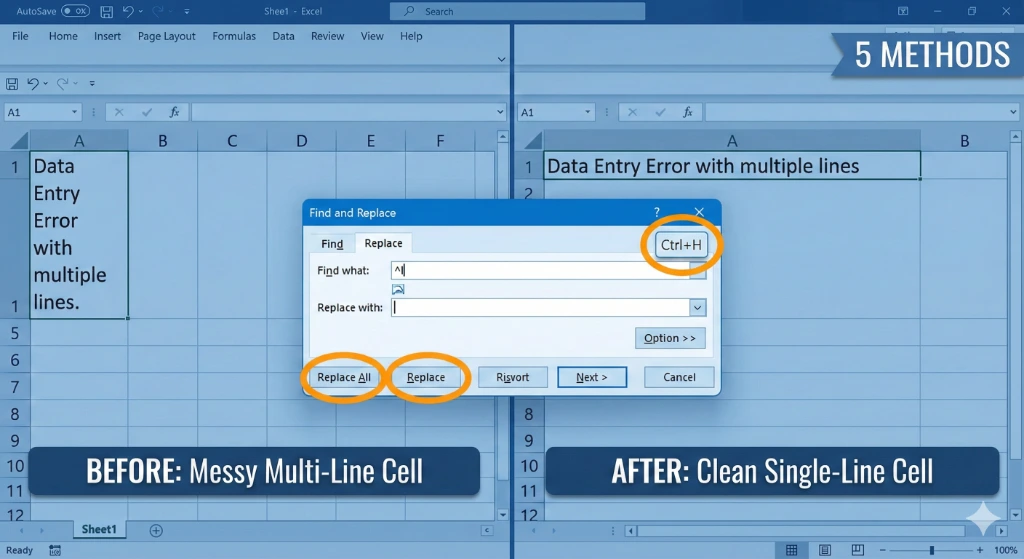
Method 1: Find & Replace (Fastest for most cases)
The fastest solution for most users. Built into Excel, requires no formulas or code, and cleans large ranges in seconds.
Why this method works best
- Finishes in under 60 seconds for most datasets
- Requires zero technical knowledge
- Directly fixes cells (no extra columns needed)
- Works across unlimited cell ranges simultaneously
Step-by-step instructions
- Select Your Data
Highlight all cells containing the line breaks you want to remove (e.g.,B2:B500or multiple columns). If you don’t select anything, Excel searches the entire workbook. - Open Find and Replace
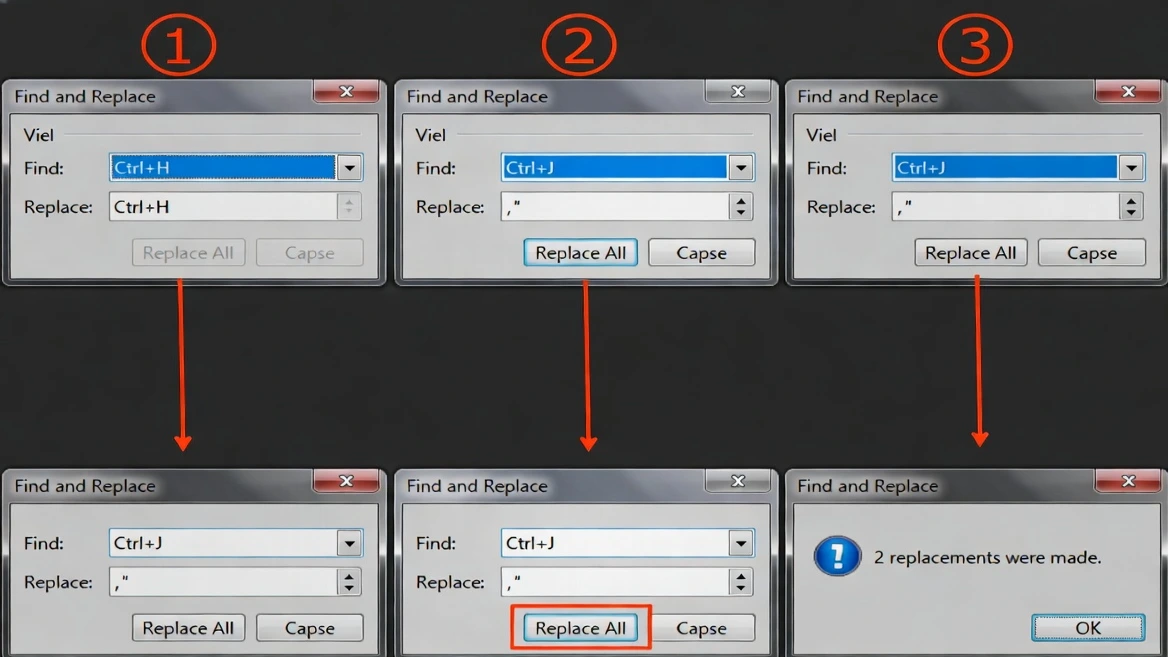
Press Ctrl + H (or Home → Find & Select → Replace). - Enter the Line Break Character
Click in Find what and press Ctrl + J. This inserts the invisible line feed (LF). The box will look blank—that’s normal. - Choose Your Replacement
In Replace with, enter one of:- Space:
- Comma + space:
, - Semicolon + space:
; - Leave empty to remove breaks entirely
,is ideal; for survey responses, a single space is common. - Space:
- Execute the Replacement
Click Replace All. Excel shows how many replacements were made. - Verify the Results
Scan a few rows. If needed, press Ctrl + Z to undo.
Practical example
Original (with line breaks):
123 Main Street
Anytown, NY 12345
After Replace with ", ":
123 Main Street, Anytown, NY 12345Pro tips
- Test on a few cells with Replace (not Replace All) first.
- Use Find Next + Replace for selective cleanup.
- You can replace with multi‑character separators such as
—.
When to use
- ✓ You need to clean data quickly
- ✓ You’re not worried about keeping original data in the same cells
- ✓ Dataset ≤ ~50,000 rows
- ✓ You’re comfortable with direct cell edits
Limitations
- ✗ Overwrites original data
- ✗ Not easily repeatable for future imports
- ✗ Targets line breaks only (other junk chars need separate passes)
Method 2: SUBSTITUTE Function with CHAR(10) (Formula‑Based Approach)
Keep originals intact and build a reusable solution by writing formulas in a helper column.
Why choose this method
- Keeps original data safe and reversible
- Works in all modern Excel versions
- Easy to audit and adapt; combines with other text functions
Understanding CHAR(10)
CHAR(10) is the line feed character (LF). In formulas, use it to reference line breaks inserted with Alt + Enter.
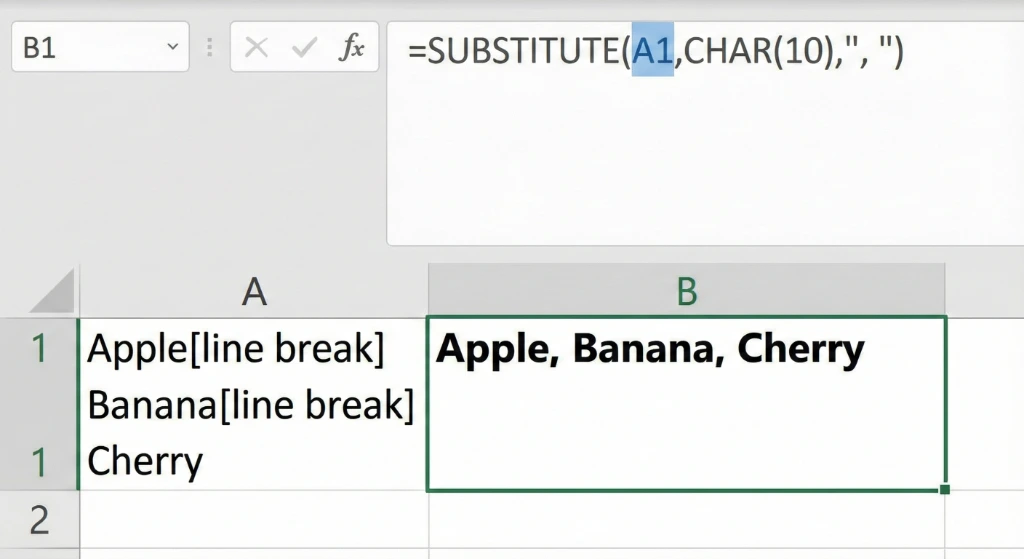
Basic syntax
=SUBSTITUTE(A1,CHAR(10),", ")A1 = source cell • CHAR(10) = line break to find • ", " = replacement
Step‑by‑step
- Create a new column next to the originals (e.g., originals in B, formulas in C). Label it “Cleaned Data”.
- Enter the formula in the first row, e.g., in
C2:=SUBSTITUTE(B2,CHAR(10),", ") - Copy down via fill handle (double‑click) or copy/paste.
- Verify a few results: spacing, punctuation, and full text.
- Optional: finalize by Copy → Paste Special → Values over the original column, then remove the helper column.
Advanced variations
- Remove line breaks entirely:
=SUBSTITUTE(B2,CHAR(10),"") - Replace with semicolon:
=SUBSTITUTE(B2,CHAR(10),"; ") - With TRIM to collapse spaces:
=TRIM(SUBSTITUTE(B2,CHAR(10),", ")) - Handle two break types (LF and CR):
=SUBSTITUTE(SUBSTITUTE(B2,CHAR(10),", "),CHAR(13),"")
Best practices
- Test on 5–10 rows before scaling.
- Choose separators that fit your use case (space vs comma vs dash).
- Combine with
LOWER,UPPER,TRIM, etc., for further cleanup.
When to use SUBSTITUTE
- ✓ Preserve original data
- ✓ Create a reusable template
- ✓ Need flexible replacements and downstream formulas
Limitations
- ✗ Needs an extra column (temporarily)
- ✗ Slower than Find & Replace on very large datasets
- ✗ Only targets
CHAR(10)unless you extend the formula
Method 3: CLEAN and TRIM Functions (Best for Data Quality)
The CLEAN and TRIM combination is a thorough way to remove not just line breaks, but also non‑printing characters and extra spacing that damage imported data. This is especially helpful for data that has passed through multiple systems. If your source is a cloud editor, knowing how to remove line breaks in Google Docs first can reduce cleanup in Excel.
What each function does
CLEAN removes non‑printable characters, including:
- Line feeds (
CHAR(10)) - Carriage returns (
CHAR(13)) - All ASCII control characters 0–31 (invisible formatting)
TRIM removes leading/trailing spaces and collapses multiple spaces to one between words.
Why combine them? Imported data often contains both hidden characters and irregular spacing. Using them together catches what Find & Replace or a single formula may miss.
The formula
=TRIM(CLEAN(B2))Step‑by‑step implementation
- Set up a helper column next to the problem data.
- Enter the combined formula in the first row (e.g., C2):
=TRIM(CLEAN(B2)) - Copy to all rows using the fill handle or copy/paste.
- Review results to ensure non‑printing characters are gone and spacing looks natural.
- Replace originals (optional): Copy → Paste Special → Values over the original column.
What CLEAN actually removes (all ASCII codes 0–31)
| Character | ASCII Code | Description |
|---|---|---|
| Line Feed | 10 | Line break (what we primarily target) |
| Carriage Return | 13 | Line break variant (especially in Windows) |
| Tab | 9 | Tab character |
| Null | 0 | Empty character |
| … (others) | 1–8, 11–12, 14–31 | Various control characters |
When to use CLEAN+TRIM
- ✓ Data comes from multiple sources or older systems
- ✓ You suspect invisible characters beyond line breaks
- ✓ You want thorough cleaning with a single, simple formula
Limitations
- ✗ May remove intentional formatting
- ✗ Less precise than
SUBSTITUTE(no per‑character control) - ✗ Slightly slower than
SUBSTITUTEon very large datasets
Method 4: VBA Macro (Best for Automation and Regular Tasks)
For the more tech-savvy, or users who handle line breaks repeatedly, a VBA macro is the ultimate time-saver. A single click can clean thousands of cells.
Why use VBA
- Fastest execution on massive datasets (100,000+ rows)
- Highly repeatable — click once, the process completes
- Can be saved and reused across projects
- Adaptable to handle multiple cleaning tasks
- Perfect for automated weekly or monthly routines
Understanding VBA fundamentals
VBA (Visual Basic for Applications) is Excel's built-in scripting language. The macro below is simple — you can use it without understanding every detail.
Step-by-step macro creation
- Open the Visual Basic Editor: Press Alt + F11.
- Insert a New Module: In the menu, choose Insert → Module. A blank code window appears.
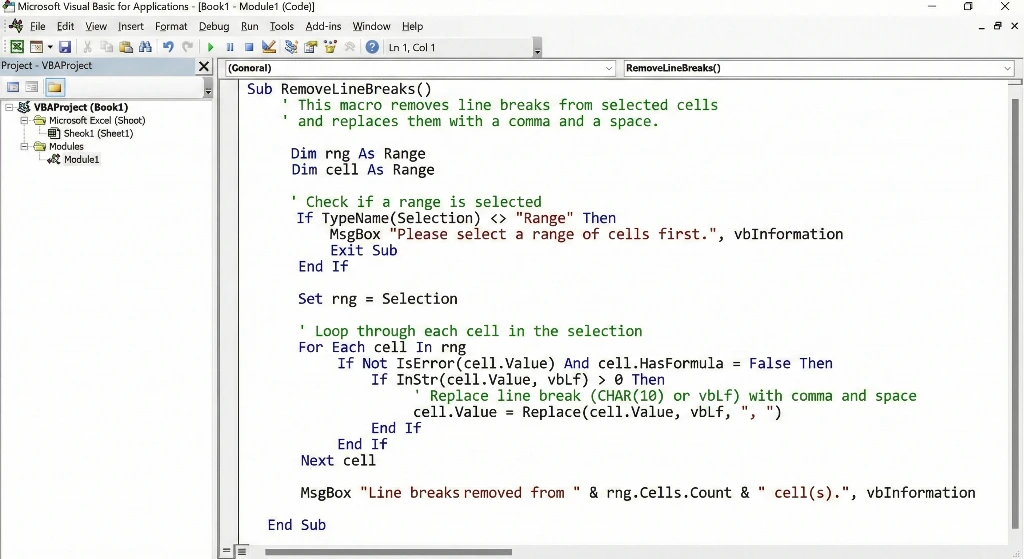
- Copy and paste the macro code into the blank module:
Sub RemoveLineBreaks()
    Dim cell As Range
    Dim selectedRange As Range

    ' If nothing is selected, select all cells with data
    If Selection.Cells.Count = 0 Then
        Set selectedRange = ActiveSheet.UsedRange
    Else
        Set selectedRange = Selection
    End If

    ' Loop through each cell in the selection
    For Each cell In selectedRange
        ' Skip cells with formulas
        If Not cell.HasFormula Then
            ' Replace line breaks (CHAR 10) with comma and space
            cell.Value = Replace(cell.Value, Chr(10), ", ")
        End If
    Next cell

    ' Completion message
    MsgBox "Line breaks removed from " & selectedRange.Cells.Count & " cells."

End Sub- Save and Close the Editor: Press Ctrl + S and save as
.xlsmor.xlsb. Close the editor. - Run the Macro: Select cells → press Alt + F8 → choose RemoveLineBreaks → Run.
Adding a Button to the Quick Access Toolbar
Right-click the Quick Access Toolbar → More Commands → choose Macros → add RemoveLineBreaks → OK.
When to use VBA macros
- ✓ You regularly clean data with line breaks
- ✓ You work with 50,000+ rows
- ✓ You want maximum speed
- ✓ You can dedicate 10 minutes to setup
Limitations
- ✗ Requires
.xlsmor.xlsb(not standard.xlsx) - ✗ Some security-conscious organizations block macros
- ✗ Steeper learning curve for beginners
- ✗ Overwrites original data (though a safe version can be coded)
Method 5: Power Query (Best for Recurring Workflows)
Power Query (called Get & Transform in some older Excel versions) is the modern, flexible way to approach data cleaning. It shines when you regularly import the same type of data from outside sources and want your cleanup to run like a repeatable workflow rather than a one‑off fix.
Why Power Query wins for recurring tasks
- You build the workflow once, then reuse it every week or month.
- No VBA or coding knowledge is required—most steps use a visual interface.
- Your cleaned data can automatically refresh when the source data changes.
- Every transformation step is documented in the Applied Steps pane.
- Power Query keeps your original source data separate and untouched.
- Perfect for automation in teams and larger organizations.
Note: Power Query is built into Excel 2016 and later on Windows. Mac users may see limited or different functionality, depending on version.
Step-by-step Power Query implementation
Step 1: Import your data into Power Query
Assume your line‑break data is in cells A1:B50:
- Select the full data range.
- Go to the Data tab on the ribbon.
- Click From Table/Range (or New Query > From Other Sources, depending on your Excel version).
- Confirm the range and whether your data has headers, then click OK to load it into the Power Query Editor.
Step 2: Explore the Power Query Editor
The Power Query Editor opens with a preview of your data. On the right, you’ll see the Applied Steps pane that records each transformation. This gives you a full, undoable history of what you do to the data.
Step 3: Replace line breaks using Replace
- Select the column that contains the line breaks by clicking its header.
- On the ribbon, go to Home > Replace Values.
- In the Value To Find box, you’d normally enter the line break character. Because you can’t type Ctrl + J directly here, this dialog can be unreliable for line feeds.
- In the Replace With box, enter your desired replacement—for example, a comma and space
,or just a single space. - Click OK to apply the replacement.
Alternative (often more reliable for line breaks):
- With the column still selected, go to Transform > Format > Replace Values or use a custom transformation step.
- If the standard Replace dialog doesn’t recognize the line break character, move to the Advanced Editor method below.
Step 4: Advanced Editor method (guaranteed to work)
For complete control, use M code in the Advanced Editor:
- In the Power Query Editor, right‑click your query name in the Queries pane and choose Edit (if needed).
- On the ribbon, select Advanced Editor.
- Find the step that references your main table—often something like
SourceorChanged Type. - Add a new step that replaces line feeds inside the target column using
Table.ReplaceValueandText.Replace. For example:
= Table.ReplaceValue(
    PreviousStep,
    each [ColumnName],
    each Text.Replace([ColumnName], "#(lf)", ", "),
    Replacer.ReplaceText,
    {"ColumnName"}
)
Replace the placeholders as follows:
PreviousStep→ the name of the step just before this one (for example,Changed Type).ColumnName→ the exact name of the column that contains line breaks."#(lf)"→ the line feed character in M; you can swap this for another code if your data uses different breaks.", "→ your desired replacement text (space, comma‑space, semicolon, etc.).
Step 5: Load the cleaned data back to Excel
- When you’re happy with the preview, go to Home > Close & Load.
- Choose Close & Load To… if you want to control where the output goes.
- Select either Existing worksheet (pick a cell) or New worksheet.
- Click Load; Excel creates a table with the cleaned results.
Step 6: Set up for regular refresh
Once your query is configured, refreshing becomes a one‑click operation:
- Point your query to a stable source, such as a folder of CSV exports or a specific Excel file.
- Whenever new data arrives, save or overwrite the source file.
- In Excel, right‑click the Power Query output table and choose Refresh.
- All your transformations—including line‑break removal—run automatically.
Example real‑world workflow:
- You receive customer feedback CSVs every Friday.
- You configure Power Query once to pull from a “Feedback” folder, remove line breaks, clean spacing, and normalize text.
- Each week you just drop the new CSV into that folder.
- Open your Excel report and click Refresh—your dashboard updates with clean data.
When to use Power Query
- ✓ You regularly import data from the same system or file layout.
- ✓ You like visual, step‑based transformations instead of code.
- ✓ You want professional, traceable data cleaning that others on your team can review.
- ✓ Your source is a CSV, database, or external Excel file.
Limitations of Power Query
- ✗ Slightly higher learning curve than basic Find & Replace.
- ✗ Power Query features are more limited on some Mac versions.
- ✗ Overkill for tiny, one‑time cleanup tasks.
- ✗ Works best with modern file types like
.xlsxor.xlsm.
Tip: For non‑Excel text (blog drafts, emails, documents), you can still use our free online line break remover to clean paragraphs before importing into Excel.
Troubleshooting: When Standard Methods Don't Work

Sometimes, line breaks refuse to disappear using the usual methods. Use this section to diagnose what’s going wrong and pick the right fix.
Problem #1: Find & Replace found 0 replacements
Likely cause: The breaks you see aren’t standard line feeds (CHAR(10)). They might be:
- Text that only looks like line breaks because of wrapping or font.
- Soft returns versus hard returns.
- Carriage returns (
CHAR(13)) instead of line feeds (CHAR(10)).
Solution: Try these variations in Find & Replace:
- In Find what, press Ctrl + J to search for the line feed character.
- If that still finds nothing, try Alt + 010 on the numeric keypad (carriage return).
- Or switch to the
SUBSTITUTEfunction usingCHAR(13)instead ofCHAR(10).
Problem #2: Line breaks are gone but formatting looks wrong
Likely cause: The data now runs together without proper separators (no commas, spaces, or other delimiters).
Solution:
- Use Find & Replace to substitute line breaks with a comma‑space, dash, or other delimiter instead of nothing.
- Use
SUBSTITUTEto swapCHAR(10)orCHAR(13)for proper replacement characters. - Double‑check that you didn’t replace the break with an empty string when you actually needed a visible separator.
Problem #3: Your formula isn’t finding the line breaks
Likely cause: Multiple types of break characters are present in the same cell (both CHAR(10) and CHAR(13)), plus other non‑printing characters.
Solution: Use a stronger "nuclear" formula that handles everything at once:
=TRIM(CLEAN(SUBSTITUTE(SUBSTITUTE(B2,CHAR(10)," "),CHAR(13)," ")))This formula replaces both line feeds and carriage returns with spaces, removes non‑printing characters using CLEAN, and then normalizes spacing with TRIM.
Problem #4: VBA macro won’t run ("Macro disabled" error)
Likely cause: Excel’s security settings are blocking all macros.
Solution:
- Go to File > Options > Trust Center > Trust Center Settings.
- Under Macro Settings, choose an option that allows macros (for example, “Enable all macros” or “Disable all macros with notification”).
- Save your workbook as
.xlsmand confirm macro enabling when Excel prompts you.
Problem #5: CLEAN removed things you wanted to keep
Likely cause: CLEAN strips all non‑printing characters, including some you intentionally used (such as special control characters from external systems).
Solution: Switch to SUBSTITUTE for more precise control. For example:
=SUBSTITUTE(B2,CHAR(10),", ")This removes only the specific character you target and leaves everything else intact.
Quick diagnostic checklist
- Verify that the Find what box really contains Ctrl + J and not a normal blank space.
- If one approach fails, immediately try a different method (Find & Replace, formulas, Power Query, or VBA).
- Use
TRIM(CLEAN())when you suspect many different invisible characters. - Copy a problematic cell into a plain text editor like Notepad to reveal hidden characters and spacing.
- Always test new formulas or macros on a small sample range before applying them to the whole dataset.
Real-World Business Applications
These scenarios show how removing line breaks in Excel directly saves time and money across typical business workflows.
Scenario 1: Address data from CRM export
Many CRM platforms (Salesforce, HubSpot, etc.) store mailing addresses with line breaks for on‑screen readability. When you export this data to Excel for analysis or label printing:
- Use Find & Replace to convert multi‑line addresses into a single comma‑delimited line like
123 Main St, Anytown, NY 12345. - This makes postal and label software read the address fields correctly.
- Time saved: roughly 2–3 hours per mailing campaign of 10,000+ records.
Scenario 2: Customer feedback consolidation
Survey and form tools often export responses with embedded line breaks inside each answer:
- Use SUBSTITUTE or a combined CLEAN+TRIM formula to turn each response into a single‑line string.
- This makes the data compatible with text analytics, sentiment analysis, and BI dashboards.
- It also prevents downstream database imports from failing or truncating values.
- Time saved: 1–2 hours every week compared with manual cleanup.
Scenario 3: Multi‑location department reports
Different departments submit monthly spreadsheets with line breaks in notes or comments:
- Build a Power Query workflow that cleans all incoming files (removes line breaks, trims spacing, normalizes text).
- Point it at a shared folder where each team drops their monthly report.
- Refresh once to combine and clean everything automatically.
- Time saved: 4–5 hours per month that becomes fully automated.
Scenario 4: Legacy system migration
When moving from an old on‑prem system to a modern cloud platform (for example, SAP to NetSuite):
- Run a targeted VBA macro that strips line breaks before the final import.
- This prevents corrupted fields, broken records, or rejected rows in the new system.
- Time saved: 40+ hours versus manually scanning and fixing thousands of records.
Scenario 5: Data merge for analysis
When combining customer or transaction data from databases, spreadsheets, and external exports:
- Use
TRIM(CLEAN())to standardize whitespace and remove hidden characters before merging. - This makes
VLOOKUP,XLOOKUP, and other matching formulas far more reliable. - PivotTables and summary reports become more accurate because records match correctly.
- Time saved: 3–5 hours for each major consolidation project.
ROI snapshot
Consider an organization processing 50,000 records every month, with 5–10 minutes of manual cleanup per 1,000 records:
- Current monthly time cost: 250–500 hours of manual cleanup.
- With automation: about 10 minutes of setup plus a few clicks per month.
- Over a year, that’s more than 2,400 hours saved.
- At $50/hour, that’s roughly $120,000+ in annual value from just one well‑designed cleanup workflow.
FAQ: Your Most Asked Questions Answered
Q1: Which method is fastest?
A: For one-time cleanup: Find and Replace (about 60 seconds). For 1 million+ rows: VBA macro (around 30 seconds). For recurring monthly tasks: Power Query (setup once, then automatic).
Q2: Why won't my line breaks go away with Find & Replace?
A: Make sure you are pressing Ctrl+J in the Find field (and not typing anything visible). If that still fails, try Ctrl+H > Advanced Options > Format > Other. Sometimes line breaks hide in cell formatting rather than the actual content.
Q3: Will removing line breaks break any formulas?
A: No. Removing the breaks from the cell content won't hurt formulas in other cells. However, if a formula itself contains line breaks (which is very rare), you need to fix that formula separately.
Q4: Can I undo if I mess up?
A: Yes! Press Ctrl+Z right away after running any method (Find & Replace, VBA, etc.). If you already saved, close the file without saving. To be extra safe, always create a backup copy before starting a major cleanup.
Q5: What's CHAR(10) vs. CHAR(13)?
A: CHAR(10) = Line feed (the standard line break created by Alt+Enter). CHAR(13) = Carriage return (less common, often found in Windows or older systems). Most Excel line breaks are CHAR(10).
Q6: Is there a way to remove line breaks but keep them somewhere else?
A: Yes—use SUBSTITUTE or CLEAN+TRIM formulas in helper columns, and then copy the resulting values. Or, use the VBA "Safe Version" described above to place the clean results in a new column.
Q7: Will these methods work on Mac Excel?
A: Find & Replace: Yes. SUBSTITUTE/CLEAN formulas: Yes. VBA: Limited (Mac has fewer features). Power Query: Limited. We recommend using Find & Replace or formulas on a Mac.
Q8: How do I prevent line breaks in the future?
A: Use Data Validation settings (Type: Text Length) or custom formulas to restrict cell entry. Train your team members not to use Alt+Enter. Use Power Query preprocessing on all imports.
Q9: Can I remove line breaks from a specific range only?
A: Yes. For Find & Replace: Select only that range first. For Formulas: Create formulas only for that range. For VBA: Select the range before running the macro, or adjust the code to target the specific area.
Q10: What if I need to replace line breaks with actual separate rows?
A: That's a different task—you would need to use "Text to Columns" or special formulas. This process is beyond simple line break removal, but we can offer guidance on that workflow if needed.
Conclusion: Choose Your Method and Get Started
Line breaks in Excel don't have to cause a data management nightmare. Whether you are a beginner reaching for Find and Replace or an advanced user setting up Power Query automation, you now have five solid, proven methods tailored to different scenarios and skill levels.
Your action steps:
- Identify your situation: Is this a one-time cleanup or a recurring task? How many rows are involved? How much time can you spend setting it up?
- Choose your method: Look back at our Quick Comparison table to select the approach that fits best.
- Test first: Always verify that your chosen method works correctly on a small sample before running it on your entire dataset.
- Execute: Follow the simple step-by-step instructions for your selected method.
- Verify results: Spot-check several rows to ensure the line breaks are gone and your data looks exactly right.
- Document the process: Write down which method you used so you can quickly repeat it next time.
The organized, clean data that results will pay huge dividends in formulas that work, successful pivot tables, accurate analysis, and professional-looking reports. That effort today is absolutely worth it.